Building an outdoor kitchen requires careful planning and systematic execution. Start by mapping your space and setting a realistic budget, then obtain necessary permits before preparing the foundation. You’ll need to install utility lines, select quality appliances, and add countertops with adequate storage. Don’t forget proper lighting, electrical features, and weather protection. Following these essential steps will transform your outdoor space into a functional cooking paradise.
Planning Your Layout and Location

Before breaking ground on your outdoor kitchen, careful consideration of layout and location will determine its functionality and long-term success. Start by mapping your available space and identifying utilities like gas, water, and electrical lines. You’ll need to guarantee proper ventilation and maintain safe distances from your home’s structure.
Key design considerations include traffic flow between cooking and serving areas, counter space for food prep, and storage requirements. Consider how you’ll position major appliances to create an efficient workflow. Environmental factors such as prevailing winds, sun exposure, and drainage patterns will impact your kitchen’s placement and usability. You’ll want protection from harsh elements while maintaining good airflow around cooking areas. Position your kitchen where smoke won’t drift towards seating areas or into your home’s windows.
Setting Your Budget and Timeline
Before selecting materials and appliances, you’ll need to establish a realistic budget that balances your outdoor kitchen vision with your financial constraints. Your timeline should account for factors like permit approvals, contractor availability, and seasonal weather conditions that could impact construction. Map out specific project milestones with target completion dates, ensuring you’ve built in buffer time for unexpected delays.
Setting Financial Priorities First
When planning an outdoor kitchen, establishing a clear budget and timeline prevents costly mistakes and scope creep. Start with a thorough financial assessment of your available resources and conduct detailed cost estimation for each component.
| Essential Items | Optional Features |
|---|---|
| Grill/Cooktop | Pizza Oven |
| Countertops | Bar Seating |
| Storage | Refrigeration |
| Utilities | Entertainment |
You’ll need to prioritize essential elements before incorporating luxury features. Allocate 50% of your budget to core cooking components, 25% to infrastructure like plumbing and electrical, and reserve 25% for unexpected costs. Consider phasing your project if your desired features exceed your current budget. This strategic approach guarantees you’ll get the most critical elements right while maintaining flexibility for future enhancements.
Creating Your Project Calendar
Successful outdoor kitchen construction hinges on a well-structured project calendar that aligns your budget with key construction milestones. Start by mapping out your project’s timeline, identifying critical phases like site preparation, utility installation, and foundation work.
Break down your calendar into specific project milestones, assigning realistic completion dates for each phase. You’ll need to factor in material delivery times, contractor availability, and potential weather delays. Consider task delegation carefully, determining which aspects you’ll handle personally and which require professional expertise.
Create buffer zones between major construction phases to accommodate unexpected setbacks. Your calendar should also sync with your budget disbursement schedule, ensuring funds are available when needed for materials and labor. Track your progress regularly and adjust your timeline as necessary to maintain project momentum.
Obtaining Necessary Permits

To guarantee your outdoor kitchen project complies with local regulations, you’ll need to obtain the proper building permits from your municipality’s planning or development department. Understanding permit types and maneuvering through the application process are essential steps before breaking ground.
| Permit Type | Required For |
|---|---|
| Building | Structural components, foundations |
| Electrical | Lighting, appliance connections |
| Plumbing | Gas lines, water connections |
You’ll need to submit detailed plans, including electrical layouts, plumbing schematics, and structural drawings. Most jurisdictions require professional drawings for projects involving gas lines or electrical work. Once you’ve gathered all documentation, submit your application and be prepared for an initial review period of 2-4 weeks. Don’t start construction until you’ve received final permit approval.
Preparing the Foundation
Before laying your outdoor kitchen’s foundation, you’ll need to select an appropriate location that considers drainage patterns, utility access, and proximity to your home. Your chosen site must feature stable ground that can support substantial weight without settling or shifting over time. Confirm the area is perfectly level or can be properly graded, as even slight irregularities will affect countertop functionality and appliance installation.
Choosing the Right Location
Selecting an ideal location for your outdoor kitchen requires careful consideration of several critical factors that will impact both functionality and safety.
Evaluate your yard’s sunlight exposure throughout the day to determine the best positioning. You’ll want to avoid areas where intense afternoon sun might make cooking uncomfortable. Consider proximity considerations, including distance from your indoor kitchen, utility connections, and existing structures. You’ll need easy access to gas, water, and electrical lines.
Position your outdoor kitchen at least 10 feet from your home’s exterior walls to prevent smoke infiltration. Guarantee proper ventilation by avoiding enclosed spaces or areas where prevailing winds might trap cooking fumes. You’ll also need to account for local building codes and setback requirements that may restrict placement options near property lines or structures.
Level and Stable Ground
A proper foundation serves as the cornerstone of any successful outdoor kitchen installation. Before proceeding with construction, you’ll need to address critical ground leveling requirements and stability considerations for your chosen site.
Start by removing all vegetation, rocks, and debris from the area. You’ll want to excavate to a depth of at least 6 inches, ensuring the soil beneath is well-compacted. For ideal stability, install a layer of gravel followed by concrete pavers or a poured concrete slab. Use a level tool to check for any slopes or irregularities, the surface must be perfectly flat with a slight grade for water drainage.
If you’re dealing with challenging terrain, consider consulting a professional to assess whether retaining walls or extra structural support might be necessary for long-term stability.
Installing Utility Lines
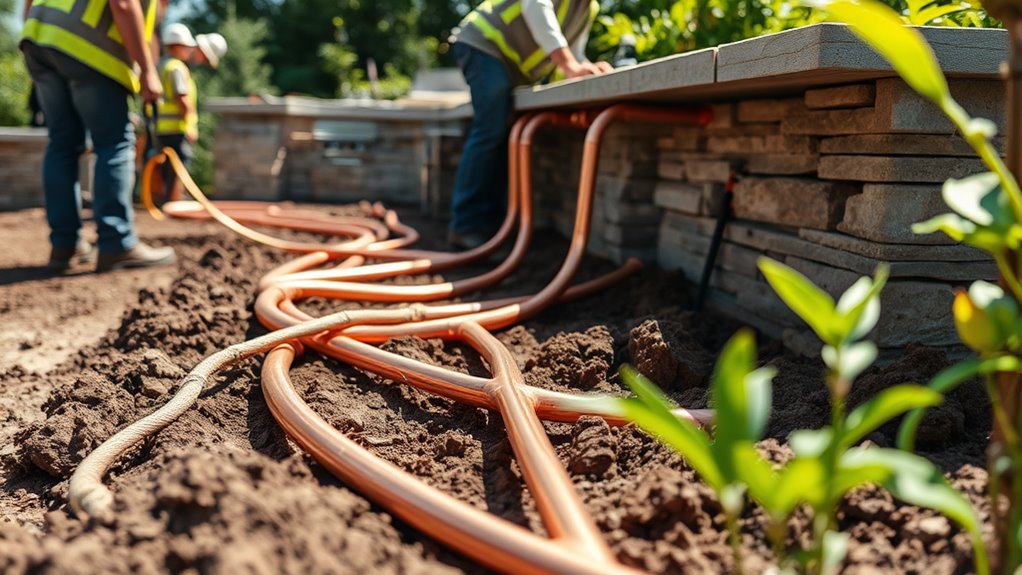
Once you’ve finalized your outdoor kitchen layout, proper installation of utility lines becomes critical for functionality and safety. Utility line installation must follow local building codes and should be performed by licensed professionals. You’ll need to map out and coordinate the installation of gas, water, and electrical lines before any construction begins.
| Utility Type | Required Depth | Safety Features |
|---|---|---|
| Gas Line | 18-24 inches | Shutoff valve |
| Water Line | Below frost | Anti-siphon |
| Electric | 24 inches | GFCI protection |
Ensure all utility lines are pressure-tested and inspected before covering them. You’ll need to maintain proper separation distances between different utilities and install appropriate conduits for protection. Document the exact location of all lines for future reference and maintenance needs.
Building the Basic Structure
The basic structure serves as the foundation for your entire outdoor kitchen and requires careful planning before assembly begins. You’ll need to select frame materials that can withstand outdoor conditions while supporting countertops, appliances, and storage components. Steel frames offer durability but may rust, while aluminum provides rust resistance at a higher cost.
Your structural design must account for weight distribution and local building codes. Start by constructing a level base, typically using concrete blocks or a reinforced concrete pad. Next, assemble the frame according to your plans, ensuring all corners are square and properly anchored. Install support beams at regular intervals to prevent sagging, and verify that the structure is plumb before proceeding. Don’t forget to include proper drainage slopes and weatherproofing elements in your framework.
Selecting and Installing Appliances
You’ll need to carefully plan your outdoor kitchen’s appliance layout before making any purchases, considering factors like gas line access, electrical requirements, and proper spacing between hot and cold zones. When selecting appliances, weigh premium features against budget constraints, as investing in higher-quality materials can greatly extend the lifespan of frequently used items like grills and refrigerators. All installations must strictly follow local building codes and manufacturer specifications, particularly regarding ventilation clearances and utility connections.
Essential Appliance Planning Guide
Planning your outdoor kitchen’s appliance layout requires careful consideration of both functionality and space enhancement. You’ll need to evaluate different appliance types while factoring in energy efficiency and proper spacing requirements. Create a detailed plan that accounts for utility connections, ventilation needs, and safety clearances.
| Appliance Type | Power Source | Clearance Needed |
|---|---|---|
| Grill | Gas/Electric | 24″ from walls |
| Refrigerator | Electric | 12″ ventilation |
| Side Burner | Gas | 18″ from grill |
| Pizza Oven | Gas/Wood | 36″ overhead |
| Ice Maker | Electric | 6″ sides |
Consider clustering similar appliances together to reduce utility runs and enhance workflow efficiency. You’ll save on installation costs by planning your gas and electrical connections strategically. Remember to include adequate counter space between appliances for food preparation and serving areas.
Quality Vs Price Considerations
When balancing quality against price for outdoor kitchen appliances, investing in higher-end core components often proves more economical long-term. You’ll want to focus your budget on critical elements like grills, refrigeration units, and ventilation systems that face constant exposure to weather and heavy use.
While you can find cost effective options for secondary items like storage drawers or warming trays, don’t compromise on quality materials for primary cooking surfaces and structural components. Consider mid-tier brands that offer reliable performance without the premium pricing of luxury labels. You’ll benefit from comparing warranty terms, as better coverage often indicates manufacturer confidence in durability. Keep in mind that replacement costs and repairs for inferior products can quickly exceed the initial savings from choosing budget alternatives.
Installation Safety Requirements
Safety codes and regulations form the foundation of proper outdoor kitchen installation, particularly regarding gas lines, electrical systems, and ventilation requirements. You’ll need to guarantee compliance with local fire regulations and building codes before proceeding with any construction or appliance installation.
- Always wear appropriate safety gear, including work gloves, safety glasses, and steel-toed boots when handling heavy equipment or working with electrical connections
- Maintain proper clearance distances between combustible materials and heat-producing appliances, typically a minimum of 6 inches for side walls and 12 inches overhead
- Install GFCI (Ground Fault Circuit Interrupter) outlets for all electrical connections and guarantee gas lines are fitted with emergency shut-off valves
Remember to schedule professional inspections for gas and electrical installations to verify they meet current safety standards and obtain necessary permits before operation.
Adding Countertops and Storage
The selection of durable countertops and adequate storage forms the backbone of any functional outdoor kitchen. You’ll need to choose countertop materials that withstand weather extremes and frequent use, while implementing smart storage solutions to protect your outdoor cooking essentials.
| Material Type | Weather Resistance | Cost Range |
|---|---|---|
| Granite | Excellent | $$$$ |
| Concrete | Very Good | $$ |
| Stainless Steel | Excellent | $$$ |
Install weather-tight cabinets beneath your countertops to store utensils, serving ware, and cooking equipment. Consider incorporating pull-out drawers, vertical dividers, and adjustable shelving to optimize space efficiency. You’ll also want to include a combination of open and closed storage options, ensuring frequently used items remain easily accessible while protecting sensitive equipment from the elements.
Installing Lighting and Electrical Features
With your storage and countertops in place, proper lighting and electrical features will extend your outdoor kitchen’s functionality well into the evening hours. You’ll need to carefully plan your electrical layout and guarantee all components meet outdoor safety codes.
- Install task lighting above work surfaces, including LED strips under cabinets and focused spotlights over cooking areas
- Mount weatherproof GFCI outlets at strategic locations for appliances and portable devices
- Add ambient outdoor lighting with wall sconces, string lights, or pathway illumination
Work with a licensed electrician to guarantee proper installation of weather-resistant conduits and junction boxes. All electrical components must be rated for outdoor use and protected from moisture. Consider installing a dedicated circuit breaker for your outdoor kitchen to prevent overloading. Remember to position lighting fixtures away from heat sources and combustible materials.
Finishing Touches and Weather Protection
Once your outdoor kitchen’s core elements are in place, protecting your investment from weather exposure becomes paramount. Install weather resistant materials like marine-grade stainless steel covers for your appliances and countertops. Apply specialized sealants to protect stone surfaces and grout lines from moisture damage.
Add aesthetic improvements that serve dual purposes: pergolas or retractable awnings provide shade while protecting your space from rain, while decorative privacy screens can block wind and UV rays. Consider installing gutters along overhead structures to direct water away from cooking areas. You’ll also want to invest in fitted covers for your grill and other appliances when they’re not in use. These protective measures will greatly extend your outdoor kitchen’s lifespan while maintaining its appearance.
Frequently Asked Questions
How Often Should I Deep Clean My Outdoor Kitchen Appliances?
You’ll need to deep clean your outdoor kitchen appliances every 3-4 months as part of your regular appliance maintenance schedule. However, if you’re using them frequently during peak seasons, consider monthly deep cleaning. Don’t forget to wipe down surfaces after each use and immediately clean any spills. For best performance, you should always follow your manufacturer’s specific cleaning guidelines and use appropriate cleaning products for different materials.
Can I Use My Outdoor Kitchen During Winter Months?
You can definitely use your outdoor kitchen during winter months with proper preparation. Install outdoor heating solutions like patio heaters, fire pits, or infrared heating systems to maintain a comfortable cooking environment. Winter cooking requires attention to weatherproofing your appliances and protecting them from snow and ice. You’ll also need to guarantee proper ventilation and keep surfaces dry. Consider adding a covered area or windbreaks for ideal winter cooking conditions.
What’s the Best Way to Prevent Pest Infestations in Outdoor Cabinets?
To prevent pest infestations in your outdoor cabinets, you’ll need a multi-layered approach. Initially, choose high-quality cabinet materials like marine-grade stainless steel or weather-resistant polymer that naturally resist pests. Install tight-fitting seals and weatherstripping around cabinet doors. Implement regular pest control measures by keeping the area clean, using food-safe repellents, and scheduling periodic inspections. Don’t forget to store food items in airtight containers and remove them after each use.
Should I Cover My Outdoor Kitchen Between Uses?
Yes, you’ll want to cover your outdoor kitchen between uses to enhance its longevity. Invest in quality covering options like custom-fitted covers or a dedicated pergola for extensive weather protection. You’ll prevent moisture damage, rust, and premature wear on appliances and surfaces. For best results, use breathable, water-resistant covers that won’t trap condensation. Don’t forget to secure them properly during high winds or severe weather conditions.
How Do I Maintain My Outdoor Kitchen’s Wooden Elements to Prevent Rot?
To protect your outdoor kitchen’s wooden elements, you’ll need a two-pronged approach: wood treatment and moisture control. Apply a high-quality exterior wood sealer annually to create a protective barrier against rain and humidity. Guarantee proper drainage around wooden surfaces, and don’t let water pool. You’ll want to clean spills immediately and maintain good ventilation. For added protection, use water-resistant covers between uses and inspect regularly for signs of deterioration.