To fix an outdoor faucet that leaks when turned off, you’ll need to target the stem assembly where worn washers commonly cause drips. Initially, shut off your home’s main water supply and disassemble the faucet using an adjustable wrench to access the stem and packing nut. Next, inspect and replace any deteriorated washers, O-rings, or packing material. Ultimately, reassemble the components with plumber’s grease and test for proper operation. Understanding your faucet’s internal mechanics guarantees long-term repair success.
Gather Your Tools and Supplies

Before addressing an outdoor faucet leak, you’ll need three vital tool categories: basic hand tools, specialized plumbing tools, and repair materials.
For basic hand tools, gather an adjustable wrench, screwdriver set, and needle-nose pliers. Your specialized plumbing tools should include a pipe wrench, seat wrench, and packing wrench. Important repair materials comprise replacement washers, O-rings, packing material, and plumber’s tape.
Proper tool selection and supply organization are essential for efficient repairs. Store your tools in a dedicated container, arranging them by category for quick access. Keep spare parts organized in labeled compartments to prevent delays during repairs. Double-check your inventory before starting to guarantee you won’t need to pause mid-repair for extra supplies.
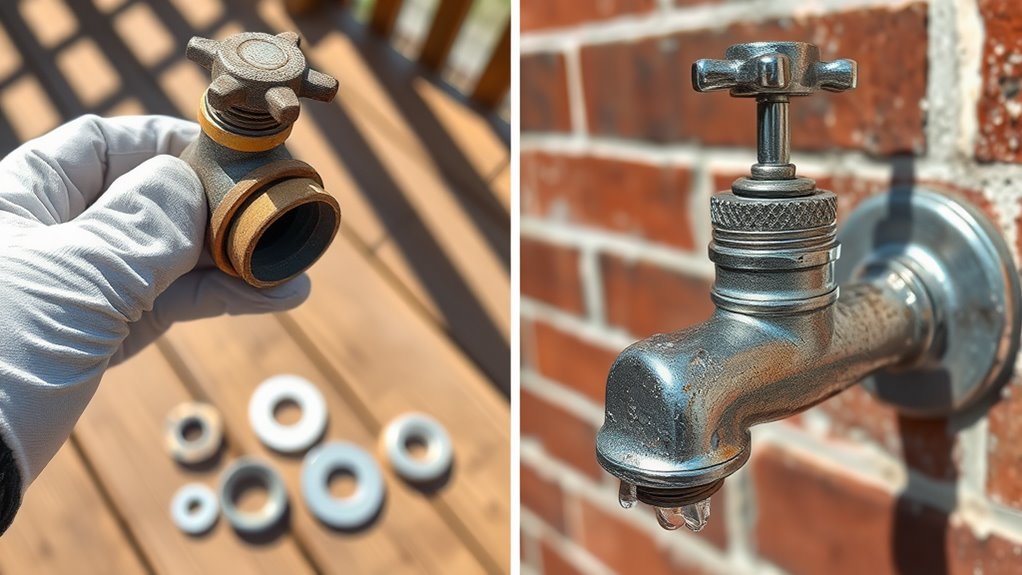
Disassemble and Inspect the Faucet
Shutting off the main water supply initiates the critical disassembly phase of your outdoor faucet repair. Using your adjustable wrench, carefully remove the packing nut and stem assembly to access the internal faucet components. During your leak inspection, pay close attention to these key areas:
| Component | What to Check |
|---|---|
| O-rings | Cracks, wear |
| Stem washer | Deterioration, compression |
| Valve seat | Scoring, mineral buildup |
| Packing | Deformation, damage |
Once you’ve removed the stem, examine the washer and packing for signs of wear. If you notice mineral deposits, use a wire brush to clean affected parts. Check the valve seat for irregularities that could prevent proper sealing. Document the specific make and model of any damaged components you’ll need to replace.
Replace Worn Parts and Reassemble
Armed with your inspection findings, proceed to replace any compromised components with exact-fit replacements from your local hardware supplier. Pay particular attention to worn washers, which are often the primary cause of leaks. Verify you’ve obtained the correct size and material specifications for your specific faucet model.
Begin reassembly by installing the new washer onto the stem, followed by the packing nut and handle. Apply plumber’s grease to threads and O-rings to prevent binding and guarantee smooth operation. When reconstructing the faucet assembly, maintain proper alignment of all components and avoid cross-threading. Tighten the packing nut just enough to prevent leaks without restricting handle movement. Test the repair by turning the water supply back on and operating the faucet through several open-close cycles.
Frequently Asked Questions
How Much Does It Cost to Repair a Leaking Outdoor Faucet?
Your outdoor faucet repair costs typically range from $150-$500, depending on the faucet types and underlying issues. You’ll pay $150-$200 for basic spigot repairs, while frost-free faucet replacements can reach $500. DIY repairs using parts like O-rings, washers, and packing nuts might only cost $10-$30. Labor rates for professional plumbers average $75-$150 per hour, though some jobs may require a minimum service fee.
Can Freezing Temperatures Cause Outdoor Faucet Leaks?
Yes, freezing temperatures can absolutely cause outdoor faucet leaks. When water inside your faucet freezes, it expands and can crack internal components or the faucet body itself. As part of your winter preparation, you’ll need to perform essential faucet maintenance by disconnecting hoses, draining the lines, and installing insulated covers. If you don’t take these precautions, you’re risking expensive repairs from freeze damage to both the faucet and your home’s plumbing system.
How Often Should Outdoor Faucets Be Inspected for Potential Leaks?
You should perform leak detection inspections on your outdoor faucets at least twice yearly as part of your seasonal maintenance routine. Schedule these checks during spring and fall when you’re activating or winterizing your exterior plumbing system. During inspections, examine the faucet assembly, including the stem, packing nut, and valve seat, while also checking for mineral deposits, corrosion, or drips. If you live in regions with extreme weather conditions, quarterly inspections are recommended.
Should I Call a Plumber for Outdoor Faucet Repairs?
Whether you need a plumber depends on your DIY repair experience and the leak’s complexity. For basic faucet maintenance like replacing washers, O-rings, or packing nuts, you can typically handle these repairs yourself with standard tools. However, if you encounter internal stem damage, cracked pipes, or issues within your home’s main water line, it’s best to contact a licensed plumber to prevent potential water damage and guarantee proper repairs.
What Causes Outdoor Faucets to Leak Only During Certain Seasons?
Your outdoor faucet’s seasonal leaks typically stem from temperature fluctuations that cause internal components to expand and contract. When water freezes, it creates pressure that can damage washers, O-rings, and packing nuts. You’ll notice these issues particularly during spring thaw or fall’s initial freeze. Lack of seasonal maintenance, comprising winterization and regular inspections, can exacerbate these problems. Furthermore, thermal cycling can gradually weaken metal components and seals.