


Installing Govee permanent outdoor lights requires five key steps for successful setup. You’ll start by sketching your layout and measuring spacing requirements. Next, gather necessary tools and materials, including mounting brackets and safety equipment. Then prepare installation points and secure brackets, followed by attaching lights and running power cables. Ultimately, set up smart controls through the Govee Home app. These foundational steps will guarantee your outdoor lighting project achieves professional-quality results.
Planning Your Layout and Measuring

A well-planned layout serves as the foundation for successful Govee outdoor light installation. Begin by sketching your layout design, marking key architectural features and areas you want to illuminate. Measure the total linear footage of your installation path, including corners and edges.
Calculate your light spacing requirements based on Govee’s specifications, typically 4-6 inches between each LED. Factor in power source locations and verify you’ll have enough lights to cover your desired area. Don’t forget to measure the distance to the nearest outdoor electrical outlet, as this will determine your power adapter placement.
Mark your mounting points with a pencil or painter’s tape, accounting for clips and corner pieces. This precise planning prevents shortages or excess material and guarantees the best light distribution across your installation area.
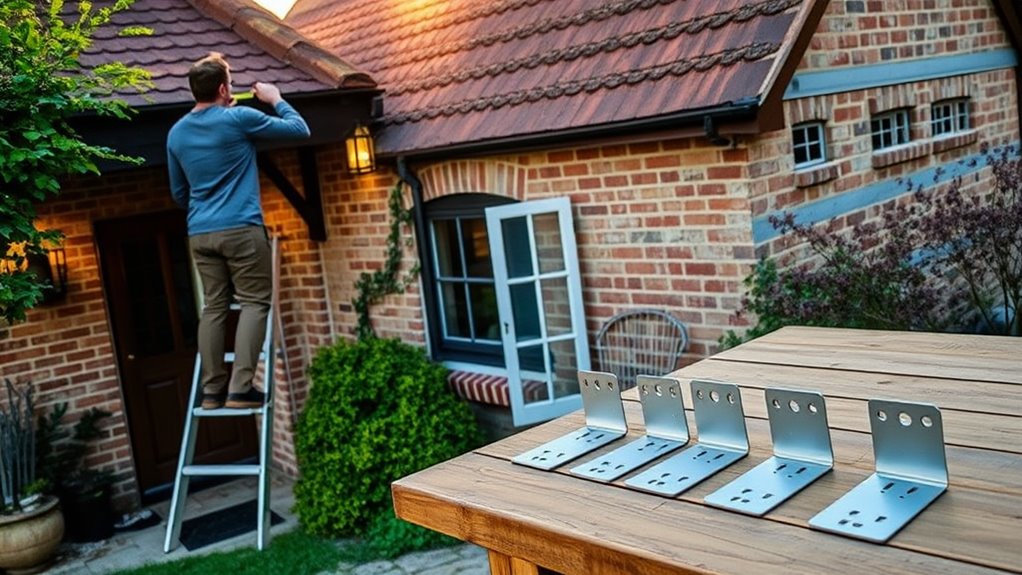
Gathering Tools and Required Materials
Having completed your layout plan, the next step involves assembling the correct tools and materials for installation. Tool selection should include a power drill, drill bits, screwdriver set, level, measuring tape, pencil, wire cutters, and safety glasses. You’ll also need a sturdy ladder that reaches your installation height safely.
For material sourcing, gather your Govee light strips, mounting brackets, screws, and anchors provided in the kit. You’ll need supplementary all-weather electrical tape, cable clips, and outdoor-rated extension cords if included length is insufficient. Consider purchasing spare mounting clips and screws as backups. If you’re installing on surfaces not covered by the included hardware, source appropriate mounting solutions from your local hardware store. Verify all materials meet outdoor rating requirements for your climate zone.
Preparing Installation Points and Mounting Brackets
Three key steps guarantee proper preparation of your installation points and mounting brackets. Initially, carefully assess each mounting surface to verify it’s clean, dry, and structurally sound. You’ll need to remove any debris, loose paint, or old adhesive that could compromise the installation.
Second, mark your bracket placement points using a measuring tape and level. Space the brackets evenly, typically 12-16 inches apart, and verify they align with your planned light arrangement. Consider factors like corners, obstacles, and power source accessibility.
Finally, pre-drill pilot holes if you’re mounting to wood or masonry surfaces. Use the appropriate drill bit size based on your mounting surface and bracket screws. For vinyl or metal surfaces, you’ll need to follow manufacturer-specific guidelines for proper bracket attachment.
Securing Lights and Running Power Cables
With your mounting brackets securely in place, you’ll begin the process of attaching your Govee outdoor lights and establishing their power connections. Snap each light segment into its corresponding bracket, ensuring they click firmly into position. Don’t force the connections, as this could damage the housing.
For cable management, route the power cables along your predetermined path, using cable clips every 12-18 inches to prevent sagging. When making turns, leave enough slack to avoid straining the wires. Connect each segment’s power cables, and seal all connection points with the provided weather protection caps. Secure any excess cable length with zip ties, keeping them snug but not overtight. Ultimately, connect the main power adapter to your outdoor electrical outlet, ensuring it’s properly sheltered from the elements.
Setting Up Smart Controls and Testing

Once your lights are physically installed, you’ll need to configure the smart control system through the Govee Home app. Download the app, create an account, and follow the pairing instructions to establish smart app integration with your outdoor lights. Enable Bluetooth on your phone during initial setup to guarantee proper device recognition.
Download the Govee Home app and pair your devices to enable smart control of your outdoor lighting system.
- Test all lighting modes and color options through the app to verify proper functionality and responsiveness of each light segment
- Configure your preferred schedules, scenes, and automation routines to optimize the convenience of remote access features
- Confirm your WiFi connection is strong enough at the installation location for consistent performance, and consider adding a WiFi extender if needed
After completing setup, test the system during both day and night conditions to confirm everything works as intended.
Frequently Asked Questions
Can Govee Permanent Outdoor Lights Be Removed Without Damaging the House Exterior?
Yes, you can remove Govee permanent outdoor lights without damaging your house’s exterior by using proper removal techniques. You’ll need to carefully heat the adhesive with a hair dryer while gently pulling the light strip away from the surface. To guarantee surface protection, use adhesive remover or rubbing alcohol to dissolve any remaining residue. Work slowly and maintain consistent pressure to prevent paint or siding damage.
How Long Do Govee Permanent Outdoor Lights Typically Last Before Needing Replacement?
You can expect your Govee permanent outdoor lights to last between 20,000 to 25,000 hours, which translates to roughly 6-8 years with regular use. To enhance their lifetime expectancy, you’ll want to follow these maintenance tips: clean the lights quarterly, check connections monthly, and avoid exposing the control box to extreme weather. While LED technology is durable, factors like weather exposure and usage patterns will impact their longevity.
Are Govee Permanent Outdoor Lights Safe to Leave on During Storms?
While Govee permanent outdoor lights are designed with storm safety in mind, you’ll want to take some precautions. These lights feature IP65 weather resistance, protecting against heavy rain and wind. However, during severe storms with lightning, it’s best to unplug them to prevent potential electrical surges. The light durability generally holds up well in typical storms, but extreme conditions like hail or flying debris could cause damage to the fixtures.
Do Govee Permanent Outdoor Lights Increase Home Electricity Bills Significantly?
Govee permanent outdoor lights won’t greatly impact your electricity bills due to their energy consumption efficiency. You’ll typically see an increase of only $2-5 per month when running them daily for 6 hours. Their LED technology consumes about 70-80% less power than traditional bulbs. For maximum cost efficiency, you can use the smart scheduling feature to automate running times and reduce unnecessary usage during daylight hours.
Can Multiple Govee Permanent Outdoor Light Sets Be Synchronized Together?
Yes, you can synchronize multiple sets of Govee permanent outdoor lights through their dedicated app. Using the Govee Home app‘s synchronization options, you’ll be able to control multiple light sets simultaneously, creating unified lighting effects and patterns. You can group different sets together, manage them from a single interface, and coordinate their colors, brightness, and effects. This feature works as long as all sets are connected to the same Wi-Fi network.